How To Format A Computer With Windows 7 or Windows 8
Installing Windows
Now here's some easy step how to format your computer with windows 7 or windows 8.
There's no doubt that Windows 7 is far better than the previous version of Windows XP or Windows Vista.
To format you need a boot disk of Windows 7 or Windows 8 which you've bought or Downloaded.
Now Here's The Steps With Pictures:
Data Backup:
Remember, to install Windows only one drive(eg: C Drive) need to be formatted. And formatting C Drive will delete everything from C Drive, My Documents Folder and Desktop. So make sure you've backed up every important file before format.
By the way, if you want format a whole Hard Disk or want to make partition then back up everything from your Hard Disk.

Data Backup
Boot Menu Setting:
To boot from CD or DVD or USB drive you have to make your CD/DVD or USB Drive first boot device in priority. To do this, while starting your computer enter in BIOS set up when Manufacturers logo screen appears. To enter in this setting page, press F2, F10, F12 or DEL key while starting your computer.(The particular key will be displayed below the screen when manufacturers logo screen appears)

Step 1
 Step 2
Now in BIOS menu go to the Boot menu option. And change the order of boot device making the CD Drive as first boot device. This will boot from CD rather than Hard Disk while starting your system.
Now Save your changes you made and exit(by pressing F10 and this may varies system to system)
Now your computer will restart.
Note: If you are installing from a USB drive, then you have to set the Removal Storage as first boot device priority.
Begin Setup:
1) After completion of BIOS setup insert the boot disc and restart your computer. Now you will see a message while start asking you to “Press any key to boot from CD…” So press any key on the keyboard and The Windows 7 setup process will be launched.

Press any key...
2) Now you can see the Windows files will be loaded. After completion Windows 7 logo will appear. Nothing have been copied or altered in your computer yet. And the data will be deleted in later steps.

Windows is loading files...
3) In this step you have to choose your preferences. Here you will be prompted to confirm and specify your Language, your time zone & Currency format, and Keyboard-input method(US). After selecting the exact options for your system click Next.
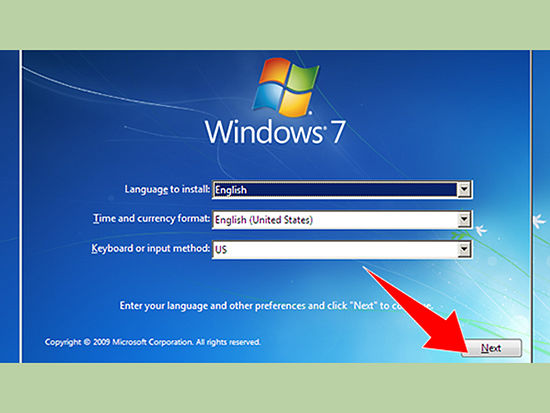
Language and Keyboard setting
4) Now click on Install Now. Do not click repair Even if you repairing your system by re-installing Windows. Once clicked, setup will proceed automatically, just wait for a min.

Install now
5) Now click on 'I accept the license terms' by reading the agreements and terms(if you want to :-P) and click Next.

Accept Terms
6) Now a screen will appear asking 'What type of installation do you want?' Choose Custom install.
If you want to upgrade from Vista then click on Upgrade. Upgrading from XP to Windows 7 is not possible.

Custom Install
7) A new window will appear asking 'Where do you want to install Windows?' Now Click “Drive options (advanced).” From here you can delete, format or manage your partitions.
8) Select the partition of your existing operating system.
9) If your Hard Disk has multiple drive then be sure and choose the correct one(Generally its always "C[Partition 1]" Drive). Because formatting a partition delete everything within this particular partition.
10) Now Click on the Drive and Click on format.

Format
11) After completing this formatting process you will be notified.
12) After the very process completed click Next. This will continue the Windows installation. And this process may take 30min to 1hour depending on the speed of your system.

Installation
13) After completion of installation your computer will be restarted.

Restrating
After starting 'Press any key to continue..." will be displayed again. But this time don't press anything. Because you already did that.
14) Now just wait for a min and your PC will continue booting and complete the whole installation process within just few more min.

Completing Installation
15) Finally the process completed.

Installation Completed
Now enter your user name(this will be your Windows name)

Windows Name
And Windows will ask you for a password. This is optional.

Password
16) Now click next and type your Windows 7 product key. And check the “Automatically activate Windows when I’m online” option. This will verify and activate your Windows next time you connected to the internet.

Product Activation
17) Now select the windows update option. To run your system securely and with stability it's recommended that you choose one of the first two options. The first will search and install updates automatically from internet. And the second option will notify you when important updates are available..

Windows Update
18) In the next window set date and time.

Set Date & Time
19) Next select network preferences. Generally most of users select Home Network. If your network is being used in public place then select public network.

Network Preferences
20) FINALLY! Everything done. After a final loading Windows will start. And now you can explore your PC.

Windows Desktop
Comments